RC snow plows can be a huge help to clear snow from your territory. It has become a huge interest in the last 5 years. There can be numerous varieties in making RC snow plows.
So, how to make a DIY RC snow plow?
No matter how big an RC snow plow you want to make, the key steps are the same. You have to build a durable structure. You have to create good traction between the wheels and the snow. You have to compose it with enough power. And make sure to keep it easily controllable.
This is only a summary of the RC snow plow building process. Well, this article is composed of more whereabouts regarding building RC snow plows.
So what are you waiting for? Dive right into this RC world.
Contents
Purpose of an RC Snow Plow
In recent times, RC vehicles are becoming more than just hobbies. You can use them to do typical household and outdoor work. Before we get into building our own snowplow, let’s know a little about them.
So what does a DIY RC snow plow do?
RC snow plows can act as a prototype for an actual snow plow vehicle. But some of the projects are thought to be working more than just a prototype. Sometimes they are designed to remove snow from the household territory. This acts as your household robot to clear your way through the snow.
What You Need to Build a RC Snow Plow
RC snow plows can be of different sizes. They can be small like 12’’x7’’ or large like 6’x3’. However, the small ones are not clinical. So, we are not going to talk about it.
So, what do you need to build a big RC snow plow?
To build an RC snow plow of length 5’-6’ and width 2.5’-3’, you need the following items –
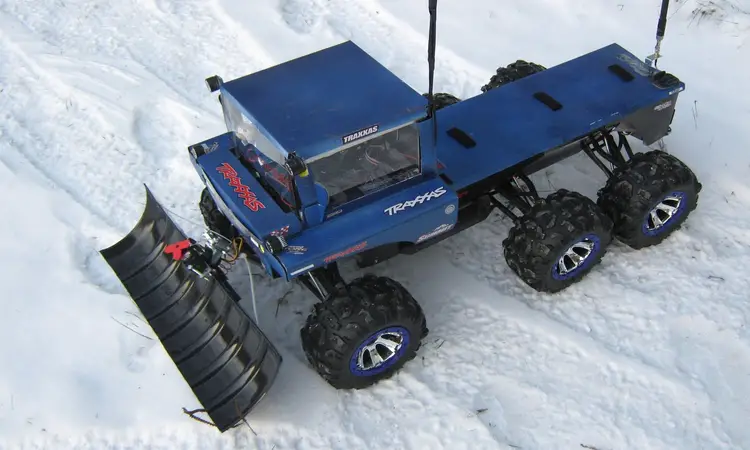
- 3’-3.5’ long curved plow
- Aluminum chassis and profile connectors
- Aluminum rails
- T-nuts and screws
- Cubes and brackets
- Motor attached chassis
- 16000 mAh LiPo Battery
- Radio Control
- 4 RC wheels (10-15 cm radius)
- Welding machine
These are the items that you need to build a Robot snowplow.
What Precautions Should One Take
At the time of building a DIY RC snow plow, you have to be careful about a few things. For example-
- You should not allow small children to hover near the workspace. This Vehicle requires a lot of small and sharp parts that kids harm themselves with. The ideal place to make this is in your garage.
- Make sure you’re not careless about the circuit and connections. A small casualty can bring down the place on fire.
- Keep fire extinguishers near your workspace.
- Don’t allow pets in your area.
- Cover your eyes while using the welding machine. Getting your eyes exposed to the flares can cause serious damage to your eyes.
These might seem very small concerns. But not caring for them can result in a huge mess. And you know that you don’t want that.
Building Your Own RC Snow Plow: Step-By-Step Guide
Now that you know what you need to build an RC snow plow, it’s time to get into action. Let’s see how we can comprehend it. For that, let’s look through the following steps about how to build a robot snow plow.
Please note that these steps are written in a format for someone who has prior experience. So you should have a certain expertise in similar RC vehicles like building an RC snowblower.
Step 1 of 4: Building A Durable Structure
For the roller car structure of the RC vehicle, you have to make it strong and light. If it’s not strong, then it won’t be able to move snow. Again, it can’t be too heavy as the motor can’t handle too much weight.
So, it’s ideal to use aluminum channels and profile connectors. Frame the channels and connectors around a chassis. Make sure to screw the nuts tightly. Connect the wheels with the engine.
If you don’t know which chassis to buy, look at these ones that we’ve picked for you-
| Image | Title | Price |
|---|---|---|
 | Share Goo CNC Aluminum Chassis | Check Price |
 | Hobbypark 04001 Metal Aluminum Chassis | Check Price |
These chassis have a good quality framework. Also, they are durable and promising.
At the front of the RC vehicle, weld two slots to hold the plow. Take two steel bars of 10 cm. Curve both of them into a u-shape. Then curve the ends of the u-bar right-angled to the outer side of the rod.
Take two steel rods of 1-1.5 feet. weld the steel bars to the u-bars. Then weld the curved plow with the extended steel rods. Finally, hook the u-bars with the front bottom of the chassis. There you’re done with the structure.
Step 2 of 4: Ensuring the Grip
It’s a known fact that wheels slip on ice. So it’s important to ensure proper grip of the wheels so that they don’t skate. There are a couple of ways to do that.
You can try inserting small nails or screws into the wheels of the RC vehicle. You should put around 50 screws or nails on each tire of the wheels. In this way, the skating of the wheels can be stopped.
But if you don’t want to pierce your tires, there’s another way to make this work. You can wrap a chain net around the tires. In this way, the tire will stay as new and your tires will also not skate.
Step 3 of 4: Installing Power Supply
The RC vehicle will lose a large amount of energy struggling against the snow. So, they need enough power supply to execute the snow shoveling. That’s why we are going to install a 16000 mAh LiPo Battery. This battery has four cells and supplies 20 volts of power. This power is enough to run the vehicle for 3-5 hours.
Connect the battery with the circuit board of the vehicle. Place the battery in the empty space of the chassis. Surround it with plastic boards and strengthen its position using nuts.
You can use NiMH batteries instead of LiPo batteries. But sometimes, NiMH batteries lose charge too fast. So it becomes difficult to finish the work with insufficient power.
Step 4 of 4: Installing a Simple Control
The main point of making this vehicle is to operate this snowplow remotely. So, let’s look into how to make a DIY remote control snow plow?
To make the RC vehicle to be remotely accessible, you have to look into two things. One, you have to use the best motor driver. And two, connecting the radio controller with the motor driver.
Use a motor driver that is capable of starting and stopping the motor. You can select either automatic or manual controls. In the case of manual drivers, you can set the speed and limit of the torque.
Whichever one you install, it should be able to feed high-torque DC motors without burning and heating. You can also try waterproofing the electronics of your RC snowplow if you want.
Now, you have to connect the driver with a radio controller. You should be able to move forward and backward. And drive sideways.
Now, you have learned about all the processes of making an RC snowplow. So, let’s just have a quick recap by taking a look at this overview-
| Step Name | Key Task |
|---|---|
| Structure building | Stabilizing the structure using nuts and connectors. Welding the plow with the chassis. |
| Creating traction | Use small nails or screws or metal chains to increase the traction between the snow and the wheels. |
| Installing power supply | Installing a powerful battery that can enable the vehicle to run for 3-5 hours. |
| Making it remotely controllable | Installing a motor driver and remote control. |
So you got the view of the complete guideline to make a DIY RC snowplow. You should be making the perfect piece if you follow all these steps properly.
Testing the Newly Built RC Snow Plow
Now that you’ve built your DIY RC snow plow, let’s take it out to see how it performs.
To test the performance of your vehicle, there should be snow in your area. You can try shoveling snow off your lawn. You can also clear the snow from the front of your garage.
It should be able to clear 1-1.5 feet of snow easily. If the snow is 3-4 feet thick, the vehicle might get stuck. If the surface is very rough and the plow might keep getting stuck. So, you might have to add a slider to the bottom of the plow.
During the whole winter, there are two types of snow. In the early stages of winter, the snow is soft and clean. This is easier to clear. In the late stages, the snow becomes muddy, unclean, and stuck. So, it is harder to clear that snow.
There you go! This is all you have to know to build a DIY RC snowplow. These RC vehicles can be very useful and save you a lot of effort and time. We hope you will try it out.
FAQs
Can I use plastic snow plows?
Yes, you can use a plastic plow from an RC shop. They are comparatively lighter and therefore, save energy waste. However, the plastic snowplow can glide over the surface. They can also corrode over time if the surface is rough.
Do I require my batteries to cover?
In this case, it is not necessary to cover your batteries. But to stabilize the structure, you can create a slot for the battery. This is what we mentioned in step 3.
How long should I charge the batteries?
For the used battery, you have to charge it for 1-1.5 hours. You’ll have to charge them in their OEM charging unit. Always fully charge the battery. Otherwise, the battery might develop a lower charging memory.
Conclusion
We hope we could show the complete overview of a DIY RC snow plow. One last tip. The RC vehicle will be the most effective based on how strong the structure is.
If you have any queries regarding these processes, you can mention them in the comment section.
Till then, all the best.