
From a worn-up gear to a snap from Thanos- a servo can blow up for a ton of reasons.
But..but..it’s not only the servo that you’ll lose. At worst case, it can force-land your RC copter on the lake/wood.
Therefore, just like the pre-flight checking of pilots, testing servos is a routine drill for RC-ers. It’d bring out any damaged, inconsistent gears and troubled circuits in servos. Not sure anything about Thanos, though.
Fun apart, if you’re in search of the best servo tester for RC copters or cars, we’ve got good news.
We’ve hand-picked and reviewed 4 of the most promising servo testers in the market. They’ve teamed up as Analog and Digital, for ease of choices.
As a bonus, some important servo testing know-how is waiting afterward.
Sorry for the super-long intro. Here we go-
Contents
- Best Analog Servo TestersG.T. Power & Sikaf Mall 3CH
- Best Digital Servo Tester
- GoolRC HJ & LewanSoul Hiwonder
- What is a Servo Tester?
- How does a servo tester work?
- Functions of Servo Tester
- Cost of Servo Tester
- Different Kinds of Servo Testers
- Features of Hitech HFP-30 Programmer & Tester
- Understanding Servo Tester Power Supply
- Frequently Asked Questions
- Bottom Line
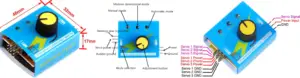
Best Analog Servo Testers
G.T. Power & Sikaf Mall 3CH
| Image | Title | Price |
|---|---|---|
 | SIKAF MALL RC Servo Tester 3CH Digital Multi ECS Consistency Speed Controler Checker | Check Price |
 | G.T. Power Servo Tester Multi 3CH ECS Consistency Speed Controler Checker CCPM Master for RC Helicopter Car Boat | Check Price |
Analog servos testers are those who don’t come with a display unit. On top of that, these are budget-friendly, costing you around $3-15/unit in general.
As the best analog testers, we have two 3-channel models from G.T. Power and Sikaf Mall. Sharing a lot between them, they have a few standout points as well.
Let’s crack open them, and understand-
What’s Common?
You can connect and check up to 3 servos to both of these testers. For testing, you can swap among the three modes- Manual, Neutral, and Auto using a push button.
You can use these servo motors to check the performance difference between brushless and coreless servo.
Same goes for ESC+Brushless DC motor combos(up to 3).
If you’re new to servo testing, here’s a little more about the modes-
- Manual: Control the input value from 800 to 2200 and rotational speed of the motor by the knob(potentiometer) provided. It’d mimic the speed that you’d turn the knob at.
- Neutral: Turning the servo to the neutral position(half of the angular range of the servo) by the input of 1500. Note that this mode comes in handy for servos only. For BLDCs, it’d just run the motor smoothly.
- Automatic: Swings the input from 800 to 2200 automatically, which rotates the servos from end to end angle.
The same can be applied for ESC or ESC+BLDC combo as well. Spinning the BLDC can enlighten you to the motor’s consistency at different speeds. And as they provide signals for the ESC without a transmitter or receiver, you can troubleshoot the ESC as well.
Moving on, both of them need 4.8-6V power input to run, giving you quite flexibility with the power supply choice. It can be a 2s LiPo, a 4-AA NiMH(4.8V), the 5V output from ESCs, or anything that’s 5V DC.
A sweet thing about this voltage range is, most of the low, mid, and high torque servos lie within it. For example- Turningly TGY-1440A of 0.6 kg.cm torque to XQ-Power 55040D of 39.8 kg.cm torque, everything can be tested.
Sikaf Mall 3CH Servo Tester: More About Product

Time to talk about the cheaper model of the duo- Sikaf Mall Servo Tester.
Funnily enough, you’ll see testers of the same size, function, and even color(blue) number of sellers. This is because it’s Chinese-manufactured and it’s not a patented design or so.
But note that, 90% of them don’t function as promised, at least with 2-3 servos/ESCs connected to it. Even with single servos, if you rotate the knob too fast, it lags or jitters. Especially, if it’s a mid-high torque servo you’re dealing with, expect these problems to come in.
Here is what we’re talking about-
However, this one from Sikaf Mall is from that other 10%. Perhaps, we’d call it the best among its kind, Period.
Among other good ones, 2-Pack tester from RGBZONE, 3-Pack tester from HiLetgo and 1-Pack DGZZI Tester are noteworthy. Another single-pack tester with slightly better structure and printed-label is SoloGood High Accuracy Servo Tester. Though, it’d cost you a few dollars more.
About the cost, usually, these blue testers cost around 5 USD. But as we’ve picked up a 2-unit combo, the cost per unit is even lower. The more units you get, the lower per-unit price you’ll be offered- simple!
Another great perk of this is how simple it is to use. RC beginners would find it as smooth as a butter.
What Needs to Improve?
- The Open-ended, blue ‘Matchbox’ case is somewhat fragile. It might invite dust and water splashes if used outside. And the longevity is also debatable.
- In the automatic mode, you can’t control the swinging speed, even with the knob.
- You’ve to hold down the push button for the Automatic mode. The moment you release it, the mode goes back.
G.T. Power 3CH Servo Tester: More About Product

Question for you- What would you expect to upgrade to the aforementioned Sikaf Mall 3CH tester? A sturdier design, better interface, more longevity, and maybe somewhat improvements in the testing accuracy, right?
With a slightly higher price, that’s what the G.T. Power 3CH Servo Tester brings to the table.
About the structure- the circuit board is inside an aluminum alloy shell on all four sides, and yet it’s a lightweight(31.5g) one. It’d prevent damages if you drop it, and also make it less exposed to dust and liquid splashes.
Overall, it’s a more durable and stronger structure than a day-to-day servo tester is supposed to possess.
Note: If you’re looking for an even stronger structure, the Turnigy Servo Tester would save your day.
Next, the user interface is slightly better. The ‘select’ button is now visible and easier to push, compared to the hidden-behind-the-plastic one on the previous model. Around the knob, there is an arc of scale, offering precise control over the input value.
About the interface, this tester from RMRC has a better one. But it’s a plastic case instead of metal.
Here’s a video from Motion RC explaining the uses of this tester with servos and ESCs-
What Needs to Improve?
- The cost is more than double of what the simpler version of such analog testers is. Might be a problem if you’re within a tight budget.
- The footprint is a bit larger than expected. This one is 48 x 42mm where the Sikaf Mall one is 46 x 32mm.
Best Digital Servo Tester
GoolRC HJ & LewanSoul Hiwonder
| Image | Title | Buy |
|---|---|---|
 | LewanSoul Servo Tester Servo Controller 1 Channel with Voltage Display | Check Price |
 | GoolRC HJ Digital Servo Tester / ESC Consistency Tester for RC Helicopter Airplane Car | Check Price |
What’s Common?
Although these two models don’t look similar, they are to some extent.
the first feature they share is the presence of a LED. What they display on it is different. But this helps to have precise control over the servo testing process.
In terms of built quality, these models are quite an upgrade to analog testers. And this goes for circuits, pints, buttons and knob- every part of them! Better build implies longer lifetime and better drop protection.
If you’re not to spend after testers once in every 3 months, take a note on this.
Talking about expenses, these testers fit in the same price point as well. It’d cost about the double of basic analog testers, but it’s 100% worth it for the value it offers.
GoolRC HJ Servo Tester: More About Product

This popular tester from Chinese HJ Electronics is rebranded by a few companies, varying one or two bucks in price. In terms of popularity, this one from GoalRC, Globact RC, S-snail, Geekstory and ICQUANZX are noteworthy.
However, let’s have a quick glance at GoalRC HJ tester-
The architecture is mostly the same as analog ones, operating within the 4.8-6V range. It can test up to 3 servos/ESC+BLDC combos. On the control panel, there are two push buttons and a knob. An enclosed (not waterproof) plastic case around the PCB provides the protection it needs.
Side Note: This version from YoungRC can test up to 7 servos.
Now, what stands this model out from other digital testers?
First, it’s the fine-tuning it offers for testing the subject. With the Select button, you can switch among three modes- S-1(manual input within 800-2200), S-2(neutral input of 1500), and S-3(Auto input within 800-2200).
The knob comes pretty handily for the first and last modes. In S-1, you can rotate the knob for the input value control. While on S-3 mode, you can use it for controlling the swinging speed. Precision at its best, isn’t it?
If you press ‘Select’ while it’s swinging on the Auto mode, it’d stop right there with the ‘then’ input value.
Next, it can take control of the pulse width of the input signal with the ‘Pulse Width’ button. Now, this works for digital servos only where different pulse widths(50Hz, 125Hz &250Hz) will let you test the response rate of the servos. Analog servos receive 50Hz pulse width by default.
Apart from the pulse width thing, the rest of the features work for ESC/Motor combos as well.
All we’ve said above is pretty well demonstrated in this video from Robojax-
What Needs To Improve?
- It can test just 3 servos simultaneously, where the version of YoungRC of the same model can test up to 7.
- The display unit doesn’t display the power supply voltage.
- It doesn’t come with a manual, at least this version from GoolRC doesn’t.
- It’s a single unit pack. Unlike the 2-unit Stemedu Tester, the per-unit cost is higher.
LewanSoul Hiwonder Servo Tester: More About It
LewanSoul Hiwonder is another Chinese manufacturer, and it’s a high voltage servo tester. Functionally, it’s pretty good at what it does, have to admit.
So, what does it do?
Before that, let’s explain the structure first-
This tester operates at 5-8.4V, which can work with pretty high-voltage servos. On the board, there are two power inputs, a potentiometer knob, a push button, and a two-digit LED that displays the battery voltage. It can operate up to 2 servos at the same time and has two modes- Neutral and Manual.
When you connect servo(s) to it, it’s on the manual mode, providing 800-2200 input to it. You can use the knob to control the input and speed. If you press the push button, it settles to neutral mode(1500). While so, you can’t rotate it with the knob unless you press the button again.
There are two small LED units beside the servo pins which will show which position you’re in.
One of the biggest selling points of this tester is its ability to test high-voltage and high-torque servos. With the wide 5-8.4V voltage range, you can test servos like- SunFounder DS-S020(25 kg.cm), Globact 35 kg.cm, etc. You can check them anyway with lower voltage testers, but can’t go full-throttle while testing.
The DC power supply also needs to lie within the voltage range. And there are two ways to connect the battery-
- The blue terminal: Accepts naked wires with any 5-8.4V DC power.
- The white terminal: Connects the charging port of the Lithium battery.
Again, the two-way power input is something that we’ve seen in no other testers yet. Another USP- you can call it.
The display will let you know how much voltage it’s operating at. So that you can set your testing goals for the servos. Pay attention that you can’t connect batteries to two ports together.
Here’s a video we found on the tester from YouTube channel ‘Cool Tools’-
What Needs To Improve?
- First, it’s a 2CH tester, operating only 2 servos at a time. A bigger and pricier version of it has 6CH design, though.
- Doesn’t have a shell/case around it. This exposes it to dust, liquid and stain. As the bottom circuit is exposed, things might go south.
- No automatic, ‘window wiper’ mode provided. You’ve to manually test how smoothly the servos are swinging.
- No manual provided and poor User Interface. It even has a few Mandarene letters printed on it!
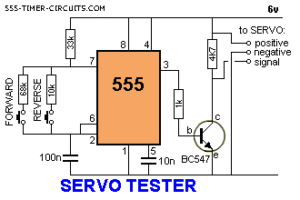
What is a Servo Tester?
Servo tester is a PCB(printed circuit board) that can be used to test up to 4 servo motors simultaneously. By testing, it helps to center the motors(usually at 1500-1550 milliseconds), check the consistency, and troubleshoot them.
In the market, servo testers can be analog, digital, or a part of a multi-tester tool. The simplest version of a servo tester contains these components-
- Power input pins: DC Battery(4.8V – 8.4V) connects here
- Output signal pins: Servo pins are connected here
- Speed control knob: A potentiometer to control the output value/speed.
- Mode selection switch: A button switch to swap between modes.
- Mode Indicator LEDs: So show at what mode the tester is in.
- Plastic cover: Labeled plastic cover around the tester.
- PCB: Circuit underneath the plastic cover, based on the popular LM555 timer chip.
- Foam Bed: On the other side of the PCB, protecting it from impacts and shocks.
On digital servo testers, you’ll get a few more components though. As in-
- Display Unit: Displays information like input(ms) value, battery voltage, pulse width(hz) etc.
- Pulse with knob/button: For controlling pulse width for digital servos.
That said, if the servo tester comes in a combo with battery tester, servo programmer, etc, you’ll get to see even more components. But let’s not go there and stick to the tester-only stuff for now.
How does a servo tester work?
If you’ve noticed before, we named a timer chip called LM555 to be the heart of a servo tester’s circuit board. It’s a 555 timer but a better replacement for SE555, NE555 or other 555 timer microprocessors.
Tip: If you understand IC circuitry, download the datasheet of LM555 from here.
What this timer chip can do is- offers precise control over the timing or oscillation of the signal that goes into servo motors.
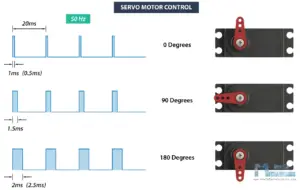
The input signal can be from 8000μs(.8 milliseconds) to 2200μs(2.2 milliseconds). For example- if the servo moves from 0° to 180°, it’d move 0° for 800 input and 180° for 2200 input. For DC motors, the motor will start at 1500-1600 and go up to 2200.
Now, you can use the knob(potentiometer) to put control over different modes. As in-
- Control the input value(800-2200) in the manual mode.
- Control the pulse width(speed of oscillation) in the auto mode.
Here is a simple servo tester circuit diagram-
Functions of Servo Tester
Knowing all the basics, let’s have a look at what functionalities does a servo tester offers. Note that it can be used to test both servo motors and an ESC+DC motor combo. And the functions will be somewhat different for both of them.
For simplifying it out, we’ve prepared a generic list of functionalities-
1 of 3: Switch among 3 Modes: Auto, Manual and Neutral
The very first thing servo testers can do is switch the operation modes.
First, the auto mode swings the input from end to end(800 to 2200). This will move the servo all the way from 0° to 90°/180°/210°.
On the Manual Mode, you can do the same by using the control knob. While roaming, you can go as slow or fast as you want to.
Lastly, the Neutral mode sets the input to 1500, bringing the servo to the neutral position, which is quite essential to have in RC planes and drones.
2 of 3: Test and Fine-Tune Multiple Servos
The modes mentioned in the previous point are basically different ways to test motor positions. At any given pulse width(explained later), the positions of the servo are fixed like the image below-
After testing the servo, If you don’t find the results as expected, there might be a problem with it. Also, if the degree of freedom(0° to 180° or 0° to 90°), your servo has defected. Also, if it lags while rotating, the gears or potentiometer inside the servo might have problems.
In some digital servo testers, you can also control the pulse width.
This ‘width’ of the pulse determines the absolute angle of the output. Changing the pulse width will change how often the signal will repeat itself and rotate the motor faster or slower automatically.
Usually, the available widths are-
- 50Hz (20μs)
- 125Hz (8μs)
- 250Hz (4μs)
For example- at 50Hz, the signal from 800 to 2200 will repeat every 20μs. If you move to 125Hz, it’d repeat the same signal every 8μs. This way, you can decide if the motor can turn properly at every speed.
Lastly, all of these health checks and troubleshooting can be done simultaneously with 2-4 motors with one servo tester. The number varies from model to model.
3 of 3: Troubleshoot ‘ESC+BLDC Motor’ Combo
Just like servos, BLDC(Brushless DC) motors also need to be checked in terms of reaction time, speed variation capacity, etc. As these motors have to be equipped with ESC(Electronic Speed Controller), the tester connects to the ESC and the ESC sends a signal to the BLDC.
One of the perks of this is, the tester can pass signals to the ESC without any transmitter or receiver. Hence, you can check out the form and troubleshoot the ESC as well.
We’ll talk about how to connect the ESC+BLDC combo to a servo tester in a while.
Cost of Servo Tester
Servo testers can cost anywhere between $4-80. But if we split them up from analog to multi-tester versions, you’d get a finer idea of the price-
| Servo Tester Type | Price Range | Recommended Models |
|---|---|---|
| Analog(basic, low-quality) | $3.5-6 | Sikaf Mall 3CH (2 units) DGZZI Servo Tester(1 unit) |
| Analog(well-built, premium) | $7-15 | RMRC Servo Tester ICQUANZX Servo Tester |
| Digital | $9-20 | Globact RC Digital Servo Tester ICQUANZX Digital Servo Tester LewanSoul Digital Servo Tester |
| Multi tester(multifunctional) | $30-80 | Spektrum XBC100(battery and servo tester) Hitech RCD HFP-30(servo programmer and tester) |
Note: In multi-testers, servo testing is kind of minor of a purpose. So, we’ve kept that out of this article while selecting the best servo testers for you.
Different Kinds of Servo Testers
If you look through the lenses of different features, compatibility, control, capacity, etc, there will be a number of comparisons among different types of servo testers.
At this point of the article, we’ll compare servo testers from 4 grounds. This would help you to hone up your buying decisions even further.
Let’s go-
Analog vs Digital Servo Testers
As the names suggest, the difference between analog and digital servo testers is the presence of a digital display.
Digital models like Globact Digital Servo Tester or ICQUANZX Digital Servo Tester come with a display unit where you can visualize the input value(800-2200μs), mode values, pulse width, etc. Another model called LewanSoul Hiwonder has the display unit to show the battery voltage instead.
On the flipside, analog models don’t have any such display units. That shreds the costs by a few dollars though.
Low Voltage vs high voltage servo tester
Servo motors run on anywhere from 4.8V to 12V. Low-torque servos ask for low voltage(4.5-6V), and high-torque ones can go up to 12V.
On that note, servo testers have to be able to provide as per the voltage requirement of the servos. You’ll see both low voltage and high voltage testers in the market.
Low voltage servo testers take 4.8-6V as input and provide input to servos that run within the same range.
Moving up across the ladder high-voltage servos can intake up to 20V DC power and can run high-voltage and high-torque servos. These servos have super-high torque and pulling capacity of 20-60 kg/cm and usually operate at 7-12V.
In some multi-testers, the higher voltage(up to 20V) input also serves for battery testing purposes.
We’ve talked about servo tester power supplies later in this article. Now, for the record, here goes a few high-voltage servo testers followed by their input voltage range-
| Voltage Range(output) | Model |
|---|---|
| 5.0-8.4V | LewanSoul Digital Servo Tester |
| 3.0-12.6V | HobbyKing Turnigy 760LV-HVr |
| 9.0-16.8V | KINGMAX TS-2 |
| 7.0-28.0V | ToolKitRC ST8 |
Now, the question is- which one should you go for? Low or high voltage testers?
The answer is- depends on your servo voltage. Servos of the most RC copters fit into the 4.8-9V range that you can test with low voltage testers. On the other hand, if your hobby demands using a range of servos from low to high-torque, you better go with a high voltage tester anyway.
Non-programmable vs programmable servo tester
Programming a servo motor provides you with sheer control over the way you want to use it. Based on whether a servo tester has this facility or not, they’re of two types- Non-programmable vs programmable.
So, what is a programmable servo tester?
These testers are a 2-in-1 combo of servo testing and programming features. You can have finer control over several functional attributes of any servo with these.
For example, let’s see what Hitech HFP-30 programmer & tester can do-
Features of Hitech HFP-30 Programmer & Tester
| Programming features | Testing features |
|---|---|
| Changing the EPA(endpoint adjustment) or Neutral position Syncing two servo motors when programming endpoints Change the rotation(Clockwise/Counter-clockwise) Change the Deadband width(DB_width) and speed Factory reset | Adjust the input(μs) manually Test between 3 automatic modes(extreme, sweep, step) Test the Deadband automatically Switch among several test modes |
Tip: Download this HFP-30 Manual if you’re interested to know further.
Regular vs Waterproof Servo TestersAs you’ve guessed already, you won’t get any programming features in a non-programmable tester. The cost will significantly drop for those testers as well.
Some hobbyists might look for waterproof servo testers, but that’s not a viable option in the market. You see, unlike servos or DC motors, a tester doesn’t get exposed to water or dust, as it’s not embedded in the RC plane or car itself.
Therefore, there are no practically ‘waterproof’ servo testers in the market. That said, some models have pretty sealed shells around the PCB/circuitry. For example- ICQUANZX Servo Tester has a durable aluminum shell, some other models have plastic shells as well.
Such shells might protect the circuitry from drops or specks of dust, but don’t essentially make them waterproof.
Understanding Servo Tester Power Supply
About all of the servo testers accept DC power supply that lies within its voltage range. As you’ve seen before, there are both low-voltage and high-voltage testers available. Hence, the power supply requirement would vary among them.
To figure out the most viable power supply, follow these steps-
Step 1: Learn the voltage acceptance range of the servo motor first.
Step 2: Make sure the servo voltage lies within the voltage range of the servo tester.
Step 3: Figure out the cell number a NiMH, LiPo, or other DC battery has to have to power up the servo tester.
Formula: A single NiMH cell delivers 1.2V. And a single LiPo cell delivers 3.7V.
Step 4: Connect the DC power supply to the tester.
Example- If it’s a 4.8-6V servo you’re testing with a low-voltage(5.0-8.4V) tester, a 5-cell NiMH(6V) would empower the tester fine.
On the high end, if you’re testing a heavier servo of 12V, you’d need testers that run on 12V or more. As batteries for those kinds of testers, you’ve to get a 4-cell LiPo battery like Traxxas 2889X.
Special Note: Few models like LewanSoul Digital Servo Tester offer a backup power supply. You can connect a 7.4V LiPo charging port to it in case you can’t manage a proper DC battery.
Here are the images of how both of them connects-

Frequently Asked Questions
What Does a Servo Tester Do?
Servo tester runs servo motors or ESC/Motor combo to test the consistency, range, and other functional attributes. It also can run multiple servos/ESCs at the same time for testing.
How to Test Servo Motor without Arduino?
The best way to test servo motors without Arduino is to use a simple servo tester. They require fewer components, cost less, and offer better testing without any programming required.
How to Run a Brushless Motor with a Servo Tester?
To run a brushless DC motor(BLDC), you need to connect it to a servo tester via an ESC(electronic speed controller). You can not directly connect a BLDC motor to a servo tester.
How to Power a Servo Tester?
You need to connect a DC battery of 4.8-6V or any other voltage that it accepts to power the servo tester. LiPo and NiMH both can be used for this purpose. You’ll find more on our “Understanding Servo Tester Power Supply” segment above.
Bottom Line
You’ve made it to the dead bottom of the article, we appreciate your patience. For many RC enthusiasts, RC testers might be just a few-dollar tool. But if the testing goes wrong with your servo or ESC/Motor, think about how many hundred dollars it can cause. It’s no joke!
Therefore, make sure you put your hands on the best servo tester for your servos.